CLICK HERE FOR FREE BLOGGER TEMPLATES, LINK BUTTONS AND MORE! »

Monday, November 29, 2010

Advent Calendar

I saw this great idea for an Advent calendar in my recent issue of Family Circle and knew I had to make it.


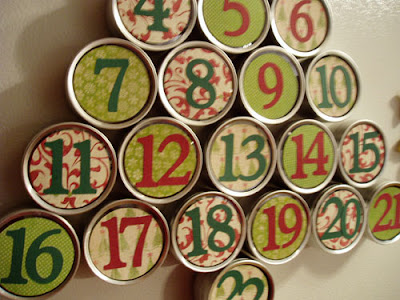
It's actually made from the aluminum favor tins you can get at AC Moore and Michaels. They come in a pack of 25 tins and with a 50% off coupon, they were just $10.

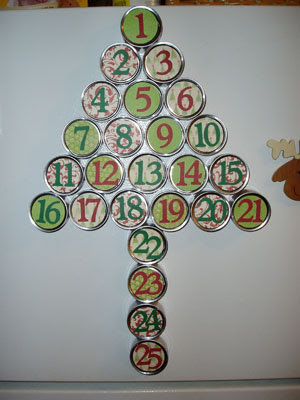
In fact, this could be considered a Cricut-less project. While I did use mine, all you really need is a 1 3/4 inch circle punch and number stickers. I used four different patterns of paper that came in one of the holiday stacks I bought recently. Then, I cut six 1 3/4 inch circles from each pattern of paper.
I cut the number using Plantin Schoolbook and then attached them to the circles and then the circles onto the lid of the favor tin. The only thing left to do was attach a magnet using a hot glue gun.
We filled the tins with M&M's and put them on the refrigerator in the shape of the tree. All in all, it was a pretty simple project and we can use it year after year.

Wednesday, November 24, 2010

Projects - Altered Notebook

So I haven't had time to post anything recently because I've been working on a few projects. The first one is for our school's upcoming "Santa Workshop." In addition to the normal items you find at these things, our PTO invites local crafters to bring in items to sell. I am going to be selling a couple of items, including these altered notebooks and the bookmarks I made earlier this year.
They are nothing fancy. I bought the notebooks back in August during the Back to School sales and bought all of them for either 10 or 25 cents a piece. The paper I used to wrap is a pack I've had lying around for a couple of months. I don't use it for cards because it is really thin, but it's great for wrapping items. It's a little thicker than wrapping paper, but not much.
I then used my ever growing scraps to make the little critters from my Create a Critter cartridge. The stamps are from My Pink Stamper and Scrappy Moms. Both of which I highly recommend!
The hardest part was actually wrapping the notebooks. At first I used my ATG gun, but it was actually too sticky and if you laid the paper down and it wasn't lined up correctly, there was no chance of getting it off without ripping the paper. I actually ended up using some double sided tape I had in the house and it worked a lot better.
I'm off to start making some of our dishes for tomorrow. I like to get a couple of them done early to free up the oven.
Happy Thanksgiving!


Monday, November 15, 2010

Busy Weekend With Expression, But No Pictures

I had a busy, fun-filled weekend babysitting my BFF's kids. Her youngest and I spent a lot of time playing with my cricut cutting out animals and making cards. The only thing i forgot to do was take pictures of all of our creations...and let me tell you there were a lot!

What's really great is how simple the cricut is to use, even with a 4-year old. She loved it and before I left was already picking out what she wanted to make on my next visit! I'm getting some work done now around the house, but hopefully this afternoon, I'm going to work on either some more Christmas cards or gift tags....decisions, decisions.

Friday, November 12, 2010

The Spirit of the Season

I wanted to enter this week's Cricut Cardz Challenge, which is to design a Christmas card using the card feature on any cartridge and any color you wanted. I used my Wild Card cartridge and the Tweety cut for my card base, the liner, and also the frame around the sentiment.

The card itself is a 5 x 5 card. And surprise, surprise....this time I actually remembered to write down the names of the paper!

The base of the card is just white cardstock. The paper that I used for the liner is from the DCWV Christmas Combo pack. That's also where I got the paper for the frame. On the tree, the base is just kraft carstock and the gree on the tree is from K & Company's Yuletide pack.

The stamp is from recollections pack and the brown ribbon is from Michaels.


Thursday, November 11, 2010

Snowman - Holiday Cheer

So the big trend this year for the holidays seems to be using "non-traditional" colors. Hot pinks, blues, aqua...very retro in my opinion. Kinda makes me think of the 70's and people had those aluminum colored trees in pink and silver.

I decided to jump on the band wagon and since I thought I could use this cute paper I got the other day at my local scrapbook store. See the hot pink snowflakes....very cute. The other snowflakes are blue and kind of an olivey green, though in the picture it looks more gold. Originally, I thought the paper was from Echo Park's new Wintertime collection, because I did buy a couple of sheets of paper from that line, but after looking at the entire paper pack online, that's not the case. So if the paper looks familiar and you know the brand...let me know!

I cut the snowman from Joys of the Season at 3 1/2 inches and coordinated his hot pink scarf with the pink in the snowflake paper. I even broke out my son's colored pencils for his carrot nose and on his broom.

The blue paper at the bottom is a leftover scrap that's kind of an aqua color. Again, I used a Recollections stamp set from Michaels and did a little more embossing. Slowly, but surely I'm getting the hang of it.

To finish the card, I did just a little faux stitching on the bottom. Again, nothing too fancy, but clean and simple tends to be my style.

Hope you like!

Monday, November 8, 2010

Happy Holidays - Pink Tree

I thought I would try a really simple card based off a holiday gift tag I saw at the store the other day. The concept is easy, use a bunch of small circles to create a tree and use a bow as the trunk.

This would be an easy card to make if you had a bunch of circles leftover from another project. That wasn't the case for me so I cut 24 circles from Plantin Schoolbook at 1/2 inch in two different shades of pink. That was the easy part. The hard part was trying to organize all these little circles! LOL.

Eventually I got the design I wanted and attached them to a white A2 card I had. The ribbon is from Michaels and it is actually the first time I've ever used a bow on a card. I can do the whole knot thing, but bows are definitely a lot harder for me.

The stamp is from a Recollections pack I grabbed at Michaels and has a whole bunch of seasonal sayings. I then used my newly purchased Versamark stamp in dazzle, white embossing powder, and new heat gun to stamp the tag. I know I little more practice with the embossing, but I though it turned out okay for my first time!

To top off the card, I added a hot pink gemstone as my star.

Again it's very simple, but I like the contrast of white and pink with just a little bit of brown.

Monday, November 1, 2010

Cupcake Notecards


Who doesn't love a cute cupcake??!! I made this set of notecards using my Wild Cards cartridge. The image comes with the candle attached, but I wanted the cards to be fairly versatile and only left it on for one of the cards. The patterned paper is from a DCWV Designer pack that for the life of me I never remember the name...(sorry about that).


I used my Xyron and Martha Stewart glitter for the frosting of the cupcakes. I really like martha Stewart glitter because it's so fine and I have to say I always use my Xyron when I'm adding glitter to something because it gives a nice even coat of adhesive.


The stamp sentiments are from the Scrappy Moms Sweet Something stamp set. I added a cupcake stamp onto the envelopes, which I think was from the $1 bin at Michaels.


There you go...Cute as a cupcake!