CLICK HERE FOR FREE BLOGGER TEMPLATES, LINK BUTTONS AND MORE! »

Monday, May 9, 2011

National Scrapbook Page MPS Challenge #7

This is my last entry into Robyn's National Scrapbook Day Challenge Marathon over at My Pink Stamper. This was Challenge #7, make a scrapbook page.

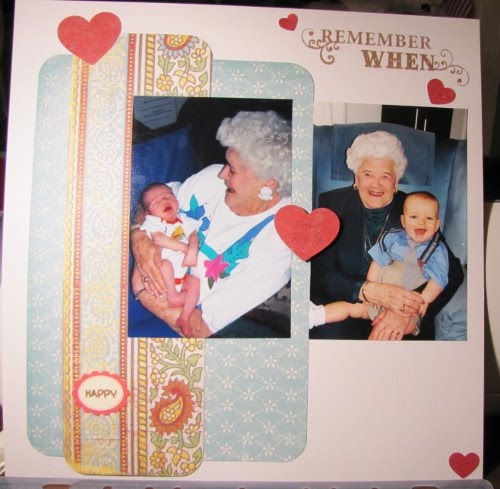
I really didn't know what page I was going to make and was going through a stack of baby pictures of my son and found these pictures with my grandmother. The picture on the left was taken the day after we brought Brady home from the hospital and the picture on the right is Brady at 9 months at his first Easter.

Brady calls her "GG" which stands for great-grandmother and I'm so happy that he has gotten to spend so much time with her. She'll be 97 in September and is such an amazing part of our family.

As for the layout itself, the paper is from DCWV and the "Remember When" is a Fiskar's stamp. I used Simply Charmed to cut the hearts at various sizes. The one that is between the pictures is stamped with the phrase "Forever Family" which is actually two stamps combined from My Pink Stamper's friends and family stamp set. The "Happy" on the little scallop sticker is also from the Friends and Family stamp set.

Sunday, May 8, 2011

National Scrapbook Day MPS Challenge #4

I was able to make one more card for NSD as part of Robyn's challenges over at My Pink Stamperon the actual day itself, but didn't get around to posting it. This is for Challenge #4 - To Make a Mother's Day Themed project. I had already given my own mom her cards, so I made this one for one of my friends who recently lost her husband following a long bout with cancer.

My hope is to "shower" her with cards every few weeks to help lift her spirits.

This card it actually "Cricut-free." The paper is one of the the 6x6 paper pack from My Mind's Eye's Stella and Rose collection and the felt flowers are from Pebbles. The "Believe" stamp is from My Pink Stamper's Family and Friends set, which you can find on Robyn's blog. It's one of her older sets.

I'm hoping to complete a few more challenges today, but I'm not sure how many I'll get done since today is Mother's Day. I'm going to try for three, but will have to see at the end of the day if that happens.

Happy Mother's Day!

Saturday, May 7, 2011

National Scrapbook Day MPS Challenge #12

I was so glad when I saw Robyn's last challenge for NSD was to make something kid related. My nephew is turning four next weekend and I needed to make a card for him and get it into the mail with his present.


Right now he is like lots of four years and is into dinosaurs. I love the dinosaurs from Create a Critter and thought it would be cute to add a little party hat on top of his head. I used Robyn's Punnilicious stamp set for the "Dino-mite."

National Scrapbook Day MPS Challenge #2

Challenge #2 over at My Pink Stamper for NSD was to make a card using kraft cardstock. I LOVE kraft and use it all the time so this was a fun project for me. I love the little pie on the Simply Charmed cartridge and thought it would go great with the "everything is better when shared with a friend" stamp. This stamp is a new set I got from Hero Arts.

The card itself is made entirely from scraps. My scrap pile has been rapidly growing and I figured now was as good a time as any to start putting a dent in it. I added a little faux stitching on the pie plate and some Glossy Accents on the cherry.

National Scrapbook Day MPS Challenge #1


It has been a crazy couple of days with lots going on at work so with today being National Scrapbook Day, it was a great opportunity to work on a bunch of cards and projects.

This is a little cupcake card I put together using paper from Cosmo Cricket's Circa 1934 line and my Simply Charmed cartridge. I'm entering it in Robyn's Challenge #1 over at My Pink Stamper.


The "sweet" sentiment at the bottom of the card is actually punched out from one of the Circa 1934 papers. Unfortunately, i don't have a 3/4 inch circle punch, but what I was able to do was use the Center point feature on my expression to cut out each of the letters...so much easier than cutting by hand.


Friday, April 22, 2011

My First Mini Album

In an earlier post, I mentioned I am working on my first-ever mini album. It's taken me a little longer than expected, but I've completed several pages, so I thought I'd give you a look. Keep in mind, I still haven't added any of my pictures because the good pictures of the trip I am documenting are on my BFF Kim's camera.

The album is about my recent trip to NYC with my best friend, Kim. Neither of us have been in the city in years. Honestly, you'd think we lived half way across the country instead of just a few hours away, but I hadn't been to NYC since I was pregnant with my son and he'll be 12 in July! Yes, I know shame on me, but we had such a great time, I know we'll be back soon.


This is us at the Top of the Rock and that's the Empire State Building in the background. It was a cold day, but there wasn't a cloud in the sky and you could see the entire city.


This is the cover of the mini album. The paper is all from Cosmo Cricket's Circa 1934 line. I love all of the vintage colors of the paper. It was perfect for our trip. I made the lollipop flower myself and was amazed at how easy it was to do. I just cut out four different sized circles and then spritzed them with water and crumpled them up. Then I just stacked them on top of each other and secured them with a little brad.


I also really liked the little banner at the bottom. It says..."for the rest of the story." What's funny is this is actually just a little phrase that's at the bottom of each of their papers. I thought it would be cute for the album since it was documenting out trip.


This is page one. I wanted to keep it very simple. Obviously I'll add a picture into the black frame. I cut out the camera from the Create a Critter cartridge and the little sticker is from the Circa 1934 kit.


On this page, I created a little pocket using a legal sized envelope. I covered it with paper from the collection and then used my 1 1/2 inch circle punch to create the little notch at the top.


Inside I added a frame to include some more pictures and some journaling about the weekend. The tag on top of the pocket is from the collection. I added the "Good Times" from a Fiskars stamp I own. And, in case you can't tell, all of the edges are inked with the Tim Holtz Distress Ink in Vintage Photo to add to the vintage feel.


This is another pocket page created with a piece of 12x12 paper. I found the tutorial on YouTube by searching pocket pages. You actually create three different pockets, two in the front and then one on the left side. I thought it would be perfect to hold some of our ticket stubs, receipts, and miscellaneous things we grabbed along the way...see the little Magnolia Bakery business card? Yep, we stopped and had a little cupcake treat.


See my little cupcake tag? I originally made this because on our way home from NYC, we stopped in Hoboken to visit....


Buddy, the Cake Boss! Unfortunately, this is as as close as we got because the line to get inside was more than two blocks long!


So there you have it, the first couple pages of my first-ever mini album. I hope to have the rest completed soon and will be sure to post them once I do.


Thanks for stopping by and enjoy!

Monday, April 18, 2011

Some Bunny Loves You


"Here comes Peter Cottontail, hopping down the bunny trail...."


This bunny from the Simply Charmed cart is just adorable. I'll admit, the little paw prints are a pain in the you know where, (You've been warned) but the overall look makes up for it. :) I made this card for my nephew, Kail.


The patterned paper is from DCWV's Nana's Kids mat pack that I got last summer. Because I don't own a Gypsy, I had to cut the paw prints and face two separate times...one on the pink paper for the paw prints and then again in an ivory piece of scrap paper for the face because I wanted to use my Peachy Keen Wide Eyed Kids stamps. I thought this would help it look like a little boy dressed in a bunny costume.


I inked around his face a little with some Distress ink to give the face some shadow. I also inked around the carrot to help it stand out a little. The "Some Bunny Loves You" was printed on the computer and then I notched the edges so it would look like a banner.


Now I just need to get this in the mail and hope it gets to Kansas by Saturday!


Enjoy!

Friday, April 15, 2011

Happy Birthday x 2

Okay, so the deal with these cards is that I wanted to make a card I had seen on Kristina Werner's blog. It's a fairly basic card, but while the look is fairly gender neutral, it's not too cute for an older boy which is where I tend to run into trouble now that my son is in "Tweendom." And for those of you who haven't had the pleasure of visiting this mythical land, it's ruled by an evil King called, Puberty and his moody minions! LOL!! So anyway, the paper is all from the Life of the Party line by Basic Grey. I bought the 6 x 6 paper pack because I knew I really only wanted the paper to make cards. The "happy birthday" stamp is from the $1 bin at Michaels and I used Versamark and heat embossed it with white embossing powder. The candles are just thin strips of paper cut from the sheet that i then added dimensionals to pop them up. The flames are just cut free hand on some scrap paper. Now onto card #2. As you can see the card uses all of the same papers and elements but with a few tweeks to make it just a little bit different. I used a different "Happy Birthday" sentiment. This one is from My Pink Stamper's Friends and Family set. I just stamped it several times down the one side. Then I used chipboard stickers for the "2" and the "U". The white "2" is a Thicker from American Crafts and the "U" is from the Lemonade set at Basic Grey. Then I just used my white gel pen to hand draw a frame around the card. That's my take on some more masculine birthday cards. Do you have trouble making cards that aren't too cute?

Hello...Is this thing on?


I can't believe it's been almost a month since I posted something here. Sorry about that! I missplaced, ie...lost my cord that connects my camera to my laptop so I haven't been uploading anything. Yesterday I brought home my camera from work and am borrowing the cable from that for the weekend. :)


So what I have been making? Well...I've actually been trying out some new techniques and have even been making my first mini album! My BFF and I took a recent weekend trip to NYC and I thought it would be the perfect way to document the trip.

Here's a sneak peek of the cover. I'm using Cosmo Cricket's Circa 1934 for the majority of the album....see my lolipop flower?


I also have been making some Easter cards and projects which I will probably post first since Easter is next week. Nothing too complicated, just some cards and gift boxes for my son and nephew.


This is my "Sweet Chick" card. Obviously, this isn't for my son or nephew! LOL. But, I wanted to make a simple card and I saw this on Edna's blog, Create with Expression and just loved what she did and wanted to make something just like it for a good friend of mine. I love her cards and ideas...check her out if you haven't!


The chick is from Simply Charmed. I used my Wide-Eyed Kids Stamps from Peacky Keen for the Eyes and just like Edna (see, I told you she has great ideas) I used Glossy Accents on the bill and feet. And of course the "Sweek Chick" stamp is from my Punnylicious set from Robyn at My Pink Stamper.


Its suppossed to rain here tomorrow so I'm going to try and post some Happy Birthday cards using Life of the Party by Basic Grey.


Happy Friday!

Tuesday, March 15, 2011

Summertime in OCNJ


I've been working on some more layouts. This one uses not only my Expression, but also a bunch of newly purchased products, including Sure Cuts A Lot 2. While I'm still going to buy Cricut cartridges, I thought it was a good investment for when I'm only looking for a certain type of image or a title for a layout. I found mine on Pumpkin Crart Crafts and got it for $54, plus I got a $10 gift card to use on svgcuts.com blog. That's where I found the "Summer time" title. It was one of their free downloads.


The paper I used is from the My Mind's Eye Good Day Sunshine Boy kit. I thought the paper would be great for summer pictures at the beach. These pictures are from my son's first time in Ocean City, New Jersey. He was just over a year old and had such light blond hair, you can hardly see it! I love how you can see the ferris wheel in the background in the picture where he's sitting on my shoulders.

I used my Simply Charmed cart to cut the bucket and shovel and the beach ball.


The stamp underneath the beach ball is from Fiskars' Good Times Quotes set which I won on a blog hop. I used my Versamark ink and white embossing powder to make it pop off the brown paper.
I still need to add my journaling onto the tab at the bottom, but other than that, this layout is done.
Enjoy!

Saturday, March 5, 2011

Two Blog Awards

Two of my newest followers, Gina and Martha, were kind enough to give me blog awards recently.


Gina over at Ginascraftingspot gave me a Stylish Blogger Award. She's alomost at 100 followers, so I'm sure she'd love it if you stop by.

As part of the award, you share 8 things about yourself and let others know about 8 new blogs you've found recently. (I combined my awards to come up with 8 total)

Here are som fun facts about me.


1. We have an 11 year old border collie named Skeets.
2. I just finished reading the Hunger Game series and thought it reminded me of a teen version of the 80's movie, "The Running Man."
3. My brother has red hair.
4. Had my first "Rita's" of the season last night...Mint Chocolate Chip cream ice.
5. Just reached 100,000 miles on my car.
6. Is in the midst of planning my 20th High School reunion...when did I get so old!
7. Am looking forward to an upcoming "girls weekend" in NYC with my BFF.
8. I am buying a Martha Stewart Score Board today using my 50% off coupon from Michaels! LOL


New Blogs i've found. Not all of these awards are for card making or scrapbooking, but they are all really crafty ladies and have fantastic ideas to share.

1. Fingerprints on the Fridge
2. Eighteen 25
3. Moxie Fab World
4. Meesh's Pieces
5. Love is in the Details


I also got a Leibster Award from Martha at The Card Boutique.

Martha has some crazy good designs and she's a party planning girl like me. Check out her blog to see the amazing safari party she recently did for her boys. A Liebster Blog Award is a way to let others know about new blogs. It's a great way to check out new blogs that you might not have known about before.

Here are the other three blogs I've found recently that I am loving!

1. Dreaming in Scraps

2. Happy Life, Crafty Wife

3. The Polka Dot Spot

Thanks Gina and Martha!

Friday, February 25, 2011

Down on the Farm Cupcake Toppers


As it says in my profile, I "dabble" in party planning. Mainly it's for family and friends for the usual birthday/baby shower/graduation parties.
I recently did a birthday party for a friend's daughter that had a barn/farm theme. One of the things I made for them were cupcake toppers using the Create-a-Critter cartridge.
I try to keep the toppers pretty simple. These toppers are cut at 2 1/2 inches. I then put a flat toothpick ( I got mine at AC Moore in the wood craft section) in between the bottom and second layers. These toothpicks actually have a round and a pointed end and I "try" to remember to have the rounded end at the bottom, but as you can see, I sometimes forget. :) Thankfully, I'm happy to report, no one poked an eye out. LOL.
Enjoy!

Saturday, February 19, 2011

So Cool Popsicles

Put together this simple card using Simply Charmed. I actually gave it to my son as a Valentine's Day card. On the inside, it said, "To the coolest kid I know!"

Now that he's 11...it's hard to come up with cards that aren't too cute. But I thought this one was cute enough for me and not too embarassing for him. LOL.

I love the popsicles on this cartridge...makes me think of summer! Yeah!

I also used my new Peachy Keen Wide Eyed Kids stamps. I'm loving these and know I'm going to get a lot of use out of them. The little sun/bottlecap is cut out of a piece of patterned paper and then I stamped it with the "So Cool" from the Punnylicious stamp set from My Pink Stamper.

Enjoy!


Wednesday, February 9, 2011

Babies, Babies, Babies

It seems February is the month for babies. In the next month, three of my former co-workers will have either had or are having babies. (I always thought there was something in the water there! LOL) Two are having girls and one is having a boy. I thought I would use the cute baby carriage from Simply Charmed to make the "girl" cards. It also gave me the chance to use my new Wide Eyed Kids stamps from Peachy Keen.

Enjoy!

Sunday, January 30, 2011

Sending You Sprinkles of Fun!

This is another Valentine's Day card I made. I'm also entering it in this week's Scrappy Mom's Terrific Tuesday Challenge, which we is to use the Sweethearts cartridge. I don't have that cart, but I do know it has an umbrella on it, so I used my Create a Critter cart for the umbrella. The "Sending You Sprinkles of Fun" sentiment is from the Scrappy Mom's Sweet Something stamp set.

The bottom part of the card is actually my favorite. What I did was use a bunch of strips of patterned paper that I had left over from some of my other Valentines cards and adhered them to a 2" inch piece of white cardstock. I then trimmed the edges and adhered it to the bottom of the card.

I can't take credit for the idea. I actually saw it on Kristina Werner's blog. She did this same technique on a acrapbook layout, but I thought it worked well for a card.

Great way to use up the end pieces of paper that we trim when making mats for cards or pictures!

Enjoy!

Saturday, January 29, 2011

Something Yummy


So in addition to making Valentine's Day cards, I need to start making more cards to have on hand. This week, we had not one, but two snow days, so I was able to make a couple of projects. I made this cute strawberry card, using a stamp from my Fruit & Veggie Puns from My Pink Stamper. The strawberries are from Doodlecharms. Robyn also did a challenge this week for her Imagine Pink Wednesdayto make something "yummy." And around here, there's nothing as yummy as a bowl of fresh picked strawberries in the summer!
By the way, don't you just love that paper in the background. It's the Circa 1934 collection from Cosmo Cricket. I bought it a couple of weeks ago and can't wait to use it to make a special gift for my BFF.
Enjoy!

Puppy Love

I've been trying to finish up some of my Valentine's Day cards this week so I can get them in the mail. I made this one for my nephew, Kail. I'm also going to enter it into this week's Challenge Me Monday at the Fantabulous Cricut Challenge, which is to use a neglected cartridge and also, the Cricut Cardz Challenge, which is to make a Valentine's Day card for a child.

So as for the neglected cartridge part, I pretty much use all of my cartridges I have expect one, Paper Pups. In fact, I've never used it. It was one of the carts that came with my expression when I got it this summer. As for the cut itself, it's not the dog...which is from Doodlecharms, it's actually, the Love at the bottom.

The cut is the card feature on page 125. My whole concept was to do a "Puppy Love" card since they have three dogs. Unfortunately, after looking through the cartridge, I really wasn't a fan of any of the dogs, but I did like the card cut from page 125 which had the word "love" cut out on the side. I thought there would be enough room for me to add the puppy from Doodlecharms, but when I cut the card out on Paper Pups, there wasn't enough room on the left. So instead, I just cut around the "Love." I'm sure it would be easier to understand if I would have taken pictures as I was working, but I didn't. :)

Enjoy!


Sunday, January 23, 2011

Love Stamp Card


Here's another Valentine's Day card. This one uses paper from the Martha Stewart Holiday Mat Stack. I had been looking for Valentine's Day themed paper, but really didn't want to buy a huge paper pack. I saw this small pack at Michaels and knew it was exactly what I needed. For just $4, there's enough paper for me to make my cards and not have a ton left over.


The stamp in the center is from the $1 bin at Michaels too.


I also used my brand new EK Success Bracket Edger Punch which I think is adorable. I saw it on another blog and thought is was really different from a lot of the other punches I've seen. I think this card has a little bit more of an elegant feel to it and think I will send it to my Mom.

Finally...My First Layout


Well I finally did it, I made my first scrapbook layout! Granted, that cute little baby you see is now 11-years old! LOL. But it's a start.

To be honest, I've been working on two different layouts. This one is from the day my son, Brady, was born and the day we brought him home from the hospital.


I think it's going to take me couple of layouts until I start to feel more comfortable with what I'm doing. I kept this one pretty simple and actually used a kit for most of it. I still want to add two tags, one at the top with his birth information and then one in that space at the bottom to put some personal thoughts.

The "hello" at the top is actually from the Wild Card cartridge. I wanted the word to be welded, but since I don't have a Gypsy, I went to Cricut Search.com to see if it was on any of the cartridges I owned. I just typed in hello and it brought up every cart that had the word along with the page you can find it on in your booklet...very helpful.


Saturday, January 15, 2011

My Pink Stamper Blog Hop

Friday night, Robyn over my My Pink Stamper held a blog hop with her new design team. To "shake things up a little", she added a twist to the hop. At each stop, you received a word, which then formed into a sentence with a special challenge.


I recently got the Doodlecharms cartridge and knew I wanted to use the mailbox for a Valentine's Day card. Then last week I found this cute patterned paper from Creative Imaginations and thought the two paired together really well. I added the "What's Up" stamp from Robyn's Punnylicious stamp set.

So, not only was I able to make my card today, but I can also add it into Robyn's hop.

I also wanted to include a little tip I learned from another one of my favorite blogs,
Kristina Werner. It has to do with my bow, which honestly I don't normally do. But she does this cool thing when making bows that you want to go all around the card.

What you do is cut a small slit in the folded side of the card and slide your ribbon through. It holds the ribbon in place while you make your bow and then you can also slide a gift card behind the ribbon on the inside.

Have a great night!

Friday, January 14, 2011

Birthday Card for Reese


So have you ever had one of those cards that no matter what you do, it just doesn't look right? That was this card for me. I like it now, but getting to this point was a real pain in the you know where! LOL.

The card is for my best friend's daughter, Reese. She's turning five this month and loooves elephants. She also loves to craft and the last time I went to visit, I took along my expression and we spent the whole weekend making cards.


I'm also going to enter this card in the Scrappy Mom's Stamps Terrific Tuesday Challenge. The sentiment I put on the inside is from their Sweet Somethings stamp set.

Happy Birthday Reese!

Valentines Treat Bag

I have been hard at work this week working on several projects, including my first scrapbook layout....yeah! It should hopefully be done by tomorrow. I also have some challenge entries I wanted to do including this one for More Than Favors: Wacky Wednesday Challenge.

This week's challenge was to make a treat bag.


I made this cute little valentines bag using an 8 x 11 sheet of pink card stock. The paper is cut at 4 x 11, so you can make two bags from a sheet of paper. Holding the paper lengthwise, you score it at 1" and 6". The 1" inch fold makes the top flap and the 6" fold should be at the bottom.

I decorated it with a piece of patterned paper and then cut two frames from Accent Essentials using the shift key. The larger frame is in a fuchsia colored paper and the smaller frame is just white card stock.

The hearts are cut from Plantin Schoolbook. I feel like I have been using this cartridge a lot lately, but it was one of the first carts I used since it came with my Expression. For basic shapes, it's definitely my "go-to" cartridge.

I then added a button and some twine and a cute little sentiment.


This is what it looks like on the inside. There is supposed to be a bag of Pop Rocks here, but you'll have to ask my 11-year old what happened to it! (LOL) Some Swiss Miss will have to do for now :)


I added another piece of patterned paper and you could also put some white card stock on top to write a message.


I'll be hopping along on the Pink Stamper Blog Hop tonight, but may try to post another one of my challenge projects tonight too.


See Ya!

Sunday, January 9, 2011

My Creative Time -Throwback Thursday Challenge

I haven't entered a challenge in awhile so I thought I would jump back into the swing of things with Emma's Throwback Thursday Challenge over at My Creative Time. The challenge was "viewers choice." The only guidelines are you have to use an older cartridge and have a heart incorporated somewhere into your design.

I had a bunch of ideas running through my head, but eventually decided to keep it simple. I used Plantin Schoolbook to cut out nine hearts in two types of patterned paper and then one blue color. The hearts themselves are cut at 1 1/4 inches.

I inked the edges on all of the hearts with a hot pink stamp I had from the $1 bin at Michaels. I then added sentiments on four of the hearts. Two of the sayings are from the Friends and Family stamp set from My Pink Stamper and the "sweet" stamp is from her Fruit and Veggie Puns set. The "sassy" on the blue heart is actually half of a "sweet & sassy" stamp from Scrappy Moms.

Tomorrow I'm off to attempt my first scrapbook layout. Keep your fingers crossed for me. :)

Monday, January 3, 2011


I'm sitting here at work killing time before a board meeting and thought I would post a picture of one of the cards I made to include in some of my card sets I gave out at Christmas. I've been wanting to do a card with birdhouses and knew there were some on my Stretch Your Imagination cartridge. I never use it and thought I would give it a whirl.

Two of the birdhouses are the same image, just cut at a different size. The long, skinny, birdhouse is made using the shift button on the birdhouse cut. The butterfly is actually cut from the backside of the base layer paper that I used, which is a DCWV designer series pack.

The sentiment in the top right corner is kinda hard to read (sorry about that...bad lighting) but it says, "Specially for You" and is from the Scrappy Mom's Stamp set, Sweet Somethings.

Despite being put together on the fly, I thought it came out really cute.